Showing posts with label DIY. Show all posts

Nov 13, 2012

Who shines white light and wants to show how everything still turns to gold.


Isn't this one totally awesome? I DIYed it today and I am so proud of it! I had this in my mind for two months, but I just never found the time. Finally, I made it today, and I am kinda proud! It's one of my favourite pieces now. I was very inspirated by the Rookie Style Nationwide, in Picture 41 there's a girl with the same one, and I was really fascinated by this picture!

Ah I ordered this dress a few days ago, and it arrived really soon after ordering it. I didn't expect it to arrive so quickly, so I was really surprised (I actually screamed out loud.) It's like super tight and I have to admit, I look kinda amazing wearing it... 


Eep! I made a Led Zeppelin shirt! I have been a fan of Led Zeppelin since I first heard "Stairway to heaven". I love this tee - I used a transfer printer foil or something and it turned out amazing! The colors are wonderful and Led Zeppelin rocks the world.


A super fun Michael Schumacher shirt ( he's a Formula 1 guy, and some of the best one's ever. Kind of a german hero, or so.) I got it for fifty cents at our local thrift store.

Hey dudes. These are just some things I bought or made the past few days. I am really busy this week, so sorry for this lack of posting. I hope everything's okay with you guys!

Love,

Mary

Oct 9, 2012

DIY goggly eyes tights


Hey lovelies! Welcome new followers, thank you so much. Today I've got a nice little DIY for you. I love creepy tights and leggins at the moment - and today my best buddy ( here's a photoshoot with her!) came up with the idea of glueing goggly eyes on tights! Genious, huh? I was like, okay, let's do that, now. Unfortunately, a few eyes fell off a couple of hours later, but I fixed them again. So, to make these tights stay forever, use super strong glue.

1. Supplies: Black tights, goggly eyes, (strong) glue.
2. Glue the eyes on. Use a hairspray can like you can see in the picture. You can arrange them randomly all over the tights, or just a line on the side, like I did!

Yay done! That was difficult, huh? ( Sarcasm in the air, my friends!) This is a very easy DIY, completed in a few minutes, and I think it turned out totally great! It is creepy and freaky and awesome at the same time. I will make an outfit post soon! How do you like it? Will you try it?

Love,

Mary


Sep 30, 2012

DIY Customized Jacket


Hey lovelies! First, welcome, my new followers! Thank you a bunch.
So, I went shopping today! I went to a fleamarket with two friends which are super cool and awesome, and I found absolutely amazing stuff. My favorite piece is is this jeans jacket, which I got from a super trouper fun old lady (She also selled white platform heels which were totally amazing.). It costed me about three bucks and fits almost perfectly! I've been dreaming of a customized jeans jacket for such a long time and today I found awesome buttons and fake flowers and stuff. This is my new favorite piece in my closet, I guess. (Well, everytime I get something new it's my favorite piece. cough.) It's so fall-ish: It's perfect for I-don't-give-a-shit-I-hate-this-cold-weather-days, you just need to throw it on and your done with today's styling. I think everyone should have a few pieces like this in his or her closet! I am really proud of how it came out. It looks pretty cool and rookie-esque, don't you think? So, lovelies, go to a fleamarket, go thrifting, and search etsy until you found a vintage jeans jacket! It's worth it. And it was so much fun decorating and customizing it. Enough of talking now, enjoy this DIY!

1. Supplies needed:  An old/vintage  jeans jacket, junk (meaning fake flowers, glitter, buttons & badges, studs, goggly eyes, patches, and random stuff.), scissors, needle and thread, a hot glue gun.
2. That's the fun part! Decorate and customize your jacket. You can glue goggly eyes on the buttons, sew fake flowers on, pin badges on, sew patches on, do whatever you want with your jacket! You can also paint it. This article shows you awesome ways to customize you jacket! Try to make the jacket be exactly you, meaning it should show your obsessions, passions, your style, and everything you like and who you are and want to be!

The nice thing is, you are actually never really done with your jacket. You can always add something!

Hope you liked this DIY! Let me know if you tried it and please send me a picture if you did. I would love to see your results.

Love,

Mary

PS: Sorry for not posting the past few days. I felt pretty uninspired...


Sep 16, 2012

DIY frilly lace socks

For today's outfit, I needed my frilly lace socks. I was used to own a pair of frilly socks, but somehow I lost them. I just couldn't find them. What I found was a pair of elastic lace tights. I rarely wear them, so I decided to turn them into lace socks. As they are elastic, there's a cute edge now. Maybe there are some people with some lace tights left to DIY.
I love frilly lace socks! They are so cute but still casual. I especially love the way they look with Ked's or Saddle shoes! How do you like them?

Supplies: elastic lace tights, scissors and a sewing machine.
1. Draw a line where you want your socks to end.
2. Cut them off.
3. Hem the upper edge. Make sure to leave space between the upper edge and the actual seam to make them frilly.
4. You are done! I hope you like your lace socks!

I hope you like this DIY.

Love,

Mary


Sep 9, 2012

Batman tights DIY


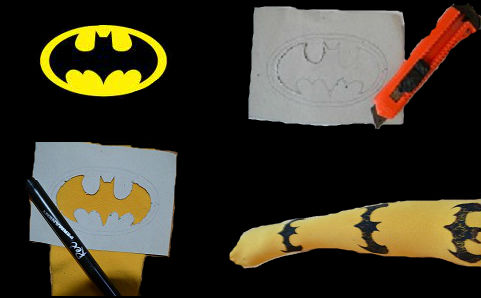
I got many comments for the Asos batman leggins yesterday, but as it unfortunately comes with a hefty price tag, I decided to DIY it. Hope you like this! Yay for batman!

1. Supplies:  Yellow tights, cardboard, a X-Acto, black paint and a batman costume for working. And a bat, of course.
2. Take your board and draw the Batman logo. Then, start to cut the bat out. You want to have a template. 
3. This is the simplest but most time-consuming part: Draw the bat on your tights. I drew four ones on each leg. Five would be perfect, I guess. Instead of a pen like in the picture, spray paint or fabric paint would also work. My pen broke after the first bat, duh. 

Yay done! Sorry for this bad edited picture... and the tights look actually way better than in the picture. I promise. I really do. So I hope I could help you, crazy-printed-leggins-obsessed-teens-without-fifty-pounds-left-to-spend-crowd!

Hope you had an amazing day,

Mary

PS: I feel like apologizing again for this awful picture. And welcome, my new followers! Love you! xxxx

Aug 20, 2012

DIY Feather necklace


Hey, lovelies. I recently made a necklace with my best buddy, you may have seen it here before. It took quite long, but was very easy and I think it came out great. I was inspired by a wonderful feather necklace seen on Etsy in the beautiful shop Rouge Pony. Hope you like this DIY!

1. You'll need: feathers, I needed about twelve, a elastic bracelet like mine, wooden pearls, superglue, a leather string and a Pearl Maker ( available in craft stores, but if you don't have one, it's no problem. You can simply glue pearls on, but this will take way longer)

2. Cut the elastic bracelet so it's no longer a ring. Then pearl it. Use your pearl maker to cover it completely in pearls. If you don't have one, glue pearls on.

3. That's the fun part. Get your best friend ready, and then paint the wooden pearls. Use different prints, you could paint a globe, or stripes, or dots, whatever you want. Then you put the pearls on the end of the feathers, to be seen in the picture. Arrange the feathers along the band.

4. Glue the feathers on. I recommend using superglue, as neither strong tape nor hot glue will work, trust me. The rest is pretty much self-explanatory: Take your leather band, string, whatever and glue it on both ends. Remember, it has to be long enough! It would be great if you have a breech to close your necklace, but it will also work without it. If the leather band is to long, simply tie it. 

5. Yay you're done! 

Have fun with your new bohemian-flair necklace!

Hope your day will be wonderful, 

Mary

Aug 18, 2012

DIY ice cream crop top


Hi, lovelies, here is a brand new and very easy DIY for you which you basically can do in about ten minutes. I saw a nice sweater like this on topshop, but I couldn't buy it because it wasn't available, so I decided to DIY it. 
1. You'll need a sheet of ironing-on paper, a pink sweater ( mine was thrifted! ), scissors. 
2. Cut the sweater off!
3. Draw a ice cream cone with ice cream on the paper.
4. Following the instructions, iron on your cone.
5. Yay you're done! I love this sweater and I think, I will wear it a lot!

Hope you all have a great day, 
Mary


Aug 14, 2012

DIY Bone sneakers


Here's the tutorial for my bone sneakers, as promised.
1. You'll need a pair of sneakers ( Ked's would be great), acrylic or fabric paint.
2. Paint the shoes all black. Remember to put out the laces as you don't want them to get black.
3. Allow it to dry, then paint pink, green and yellow bones along the shoe sole. Let it dry and you are done! Have fun with these crazy rad sneakers!


Aug 9, 2012

DIY Deer tote

I made up a little easy DIY for you a few weeks ago and I'm wearing this bag again and again. I saw this print on a similar bag and couldn't resist DIYing it. Hope you like it!

1. You'll need: a tote ( if it isn't printed like mine, you can forget the next three steps), white fabric, tailor's chalk, a fabric pen, and scissors. And a sewing machine.
2. Lay your tote on the fabric and measure out how much fabric you'll need for your own just white tote.
3. Sew the two layers together. (That's easy, no need to explain. Everyone can sew a tote. )
4. Sew the bag handles on ( I cut mine off of my printed tote. )
5. Print a deer or draw one on a sheet of paper. You can use it as a pattern.
    Now draw the deer down on the fabric. Draw huge antlers across the whole upper part of the tote. You are done now! Have fun         with your new DIYed tote.

Have a nice day, Mary

Aug 7, 2012

DIY Cutoffs


1. Supplies: Scissors, 89' washed jeans ( Mine were thrifted and costed me about fifty cents! ), and a file. 
2. Mark the length you want an cut it off. Destroy the seam.
3. Destroy! Use your file to get the perfect ribbed shorts.
4. Yay you're done! You've got your perfect vintage high-waist-shorts! If the waist doesn't fit, just wear a belt. These would look absolutely amazing with a band shirt.

As this is my first blogging summer, you can expect many DIYs and random stuff and shopping. I will go to Primark in a week, hopefully. I was looking forward to this trip for two weeks and I keep telling everybody what I am going to buy. Yesterday I've even dreamt that the shoes I want weren't in stock in my size! What a nightmare!
The weather is bad again. I mean, it is still summer, it shouldn't be to cold for shorts and stormy?! That's so unfair, what can I do with all the summer dresses and sleeveless tops and shorts and skirts? I will wear them, it doesn't matter how cold it would be! 

have a nice day, and a wonderful rest of summer,
Mary

Aug 6, 2012

How it looks like when I am bored

When I am bored, I write and draw everything down that comes into my mind. Most of the time, my friends start drawing with me and suddenly, there is no space left on my paper. All my entries in my exercise books look like this. Cough. The good thing is, "drawings" like these look like a mind map from 1975. What is great. And here's how to escape your boredom and creating something nice at the same time. RANDOM RULES!


1. 3-D-Lettering can look pretty awesome. That brings us to another important thing: Use many, many different kinds of handwriting. Like capitals and cursive and stuff. 


2. Arrows! Arrows are awesome! Again, use many different ones.


3. If you are sick of arrows, you can draw real "mind-map stuff". But not only a cloud and a few lines but an amazing octopus with as many tentacles as you need. For example, if you are thinking of fashion and sewing, you can draw a pattern of a shirt next to the octopus' head and many different print next to the tentacles. Which leads us to...


4. Symbols! If you are thinking of better weather, draw a sun. Draw skyscrapers if you wanna visit a big, big city. Draw smileys, simply draw all the random that come's into your mind. And if you are a really, really awesome person ( I assume you are) you'd draw...

5. Pacman! Drawing Pacman helped me through uncountable lessons in the past few weeks.


6. If you have colorful pens and prints and highlighters, mix everything together like a collage. Color your life :DD ( and, just in case, if someone highlights you, don't mind. It'll be fun. )

Random. I know. Random. Don't mind. It came into my mind.

Have a nice day, Mary


Jul 31, 2012

Daisy sunnies DIY


Inspired by a pair of wonderful sunnies seen on Rookie I made up a little crazy DIY for you.
1.You'll need: A pair of sunnies like mine, thick white paper, scissors, acrylic paint in yellow (optional) and a hot glue gun. Paint your sunnies yellow, if they aren't already. Don't be stupid and paint the actual glasses you see trough ( I assume you aren't. ) .
2. Then take the thick paper and fold it like a fan. Draw a petal, hold it and cut it out. You should have more than one petal ( yay it's magic!)
3. Now, take your hot glue gun and glue the petals inside the sunnies like you see on the picture. I recommend only two or three petals on the bottom part of the sunnies. Allow it to dry and you are done! Have fun with these freakin' awesome sunnies. :)
Oh, yeah, there's something else... Happy summer holidays, everybody! YAY!

xoxo, Mary

Jun 25, 2012

Rock your school bag

School's boring and sucks especially before summer holidays. You know it is important, though, you have to learn to get a good job and so on. You've heard that a thousand times. All that you need is a little less boredom and DIYs like these. It will help a lot if you have cool things lying on your desk, trust me. xoxo, Mary


This is my scrapbook, the cover is made out of an old magazine and a encyclopedia. DIY ALERT!
My diary for not only homework. This is the cover with pictures of all my friends and stuff.

This is what it looks inside. There isn't enough space for homework at all, it is more like a real diary. Don't take a close look... my friends like to write stupid things. Cough.


This is Massopilami. my pencil case. He has earrings, a necklace, eyeliner and even a tattoo. Isn't he cute? :DD